Table Of Content
Due to the way they’re cut, layered hairstyles take longer to grow out. Remember, some layers are shorter than the others — the time it’ll take the short layers to equal the length of the longer layers can be significant depending on the cut. If you wear your hair down often, a layered haircut looks good with very little styling. You could let it air dry, run your fingers through it, rub or spray a dab or product in it, and you’re ready to walk out the door. Committing to DIY bang trims—and this tutorial for straight hair is a great place to start. Now that you've made a loose face-framing shape, we will use point cutting to fine-tune our layers.
20 Low-Maintenance Haircuts to Try - InStyle
20 Low-Maintenance Haircuts to Try.
Posted: Thu, 14 Sep 2023 07:00:00 GMT [source]
Sections Method
Beginning at your shortest length, slowly lift the hair in small sections and make soft cuts directly into the hair. This will soften our lines and give us another chance to eliminate any frayed-looking ends. It will also help us lighten things up wherever the hair appears bulky.

Find a tutorial
Herewith, professional hairstylist Ashley Rubell shares an illustrated, 10-step guide that will teach you how to cut face-framing layers at home. Plus, celebrity hairstylist Graham Nation adds tips for curly girls. We have selected the most helpful videos that teach to create every style, from blunt bangs and face-framing layers to lob and buzz cut. Follow these step-by-step tutorials and enjoy your refreshed hairstyle. If you have very curly hair, try a DIY Deva Cut, another technique that requires dry natural hair.
How to trim your own hair:
The front sections of hair are cut using the transition over the ear as a guideline. Women with straight or slightly wavy hair are good candidates for a layered cut created with the blended elevation technique. The shorter top section blends with the softer layers in the back and on the side of the head.
These Layered Cuts Are Trending This Year
Cutting Your Own Fringe At Home: How To Guide - ELLE Australia
Cutting Your Own Fringe At Home: How To Guide.
Posted: Thu, 02 Apr 2020 07:00:00 GMT [source]
With this in mind, I will start the layers between my cheekbones and chin. Starting just below the chin will always be your safest bet if you have extra long hair. No matter your hair length or face shape, you never want to start your face-framing layers above the cheekbones or nose level. If you like to toss your hair around or switch up your parting frequently, settle on a center parting. Once you've identified and cleaned up your parting, use the edge of your cutting comb to section your hair from about half an inch behind the ears. Going slightly past the ear line should give you a bit from the back length so that you're cutting to meet the longest point of the hair.
In fact, if your strands are curly or you're wavy-haired, only cut your hair when it's dry so you can get a better idea of what the final look will be. If you have straight hair, you can cut while it's wet or dampen it with a spray bottle first to get the cleanest, sharpest lines possible. If you have long hair and you’ve been wondering how to cut your own hair in layers, bobbles are the answer. To DIY the so-called ponytail haircut, simply scrape your hair into a pony at the front of your head, comb the ponytail, and chop the tips off straight across with scissors or clippers. Some point-cutting added, and voila – you have a haircut with long layers! This works for hair of almost any length, starting from lob cuts and ending with mermaid locks.
Instead of trying to tame your curls into one single length, go with the flow of your hair. First and foremost, your main tool will be a pair of sharp hair scissors. Be sure to invest in a fine-tooth comb, as it is essential to smooth out disobedient hair before every snip.
DIY Flexi Clips [Design it Yourself Lilla Rose Flexi Hair Clip!]
If you’re going to cut your own hair at home, you’re going to need the proper tools. Don’t worry, you don’t have to go to any specialist shops, you can find most of these in your local beauty store. Create sections in the front on the left and the right side, beginning at your temples and ending at the top of your ears. Start with freshly washed, damp — not dripping wet — hair for the best results. Using a microfiber hair towel wrap is an excellent way to achieve the perfect level of dampness.
How to Cut Bangs
Carefully slide your fingers towards the ends of your hair, stopping when they’re level with the length at which you prefer the shortest layers to begin. When hair is layered, the strands closer to the crown of the head are cut shorter than those beneath them. This technique results in the shorter layers blending with the longer layers below. Some cuts enhance the blended effect, while others emphasize distinct layers. Certain hair color techniques play up the layering effect, as well.
Using point cutting to blend our lengths, we'll be able to soften any "shelf" looking areas in curly or wavy hair and any disconnected areas for smoothed-out strands. Blending your front layers into your overall length is important to avoid disconnection between your longest front layer and the ends of your overall hair length. While stylists will warn you not to attempt some hair-shaping moves at home, face-framing layers can be achieved without leaving your bathroom.
While a salon appointment with a trained hairstylist is the safest way to go for any kind of haircut, sometimes you gotta do it yourself—and that’s okay. Just make sure you have sharp hair shears, a thorough tutorial featuring your own hair type, and expert advice (like…everything above), and when in doubt, cut less, not more. If you’re seeking a look that comes off as a single layer, with ends that are softly layered, a sliding haircut may be a good fit for you. It’s ideal for medium wavy hair, so make sure you consider this. The sliding haircut is created by sectioning the hair into four parts and cutting it radially at a 20-degree angle.
There’s technically no right answer here, since cutting your hair wet or dry is all about personal preference. If you have very straight hair, you’ll need to keep your hair wet so that you can get each snip perfectly even. However, curly hair can look entirely different when it’s wet than when it’s dry (it is called shrinkage), so it’s often safer to cut hair dry, in its natural state. If you’re not sure whether to cut your hair wet or dry, just copy what your regular hairstylist does at the salon. Layering hair is achieved by pulling sections of hair perpendicular to the head and cutting straight across the hair. While a variety of layered haircuts exist, there are two main techniques.
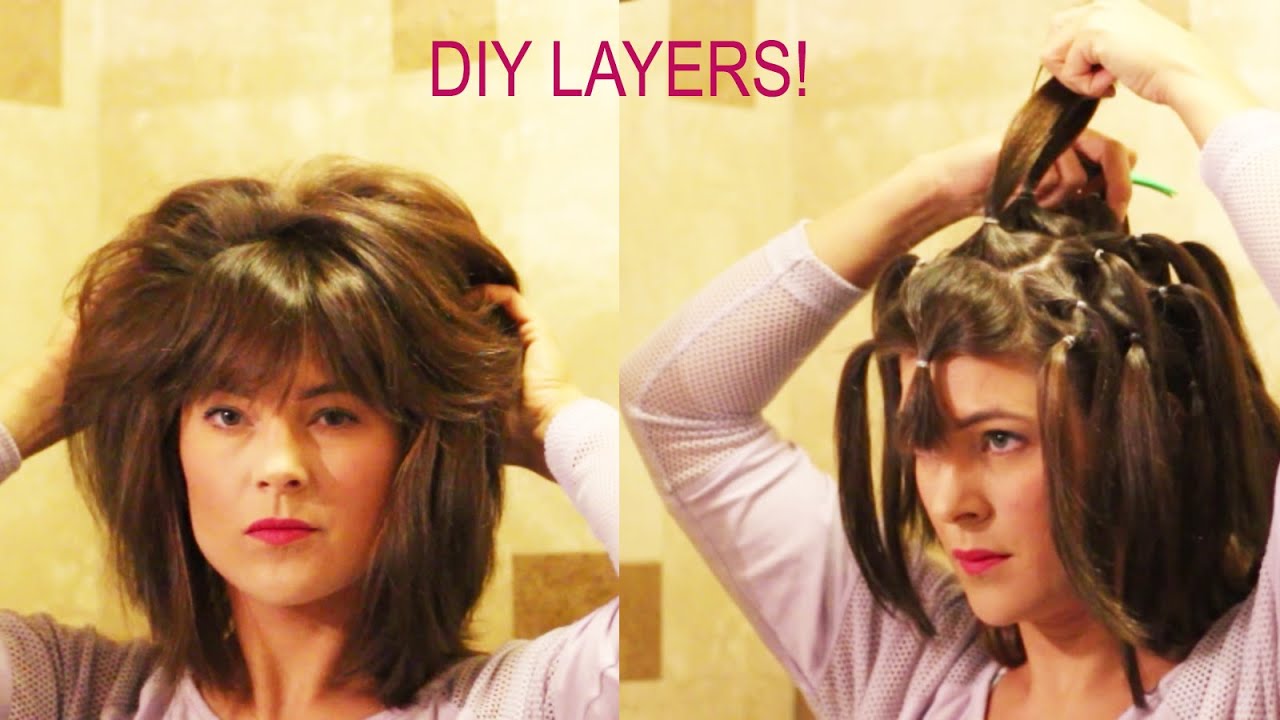
If you want to cut your lob, bob or shoulder-length hair, this method involves bringing hair to the front and securing with small elastics before trimming off ends. Clean up any choppy ends with small, precise cuts for best results. It can be easy to think that your hair needs to be perfectly straight every time you cut a piece, but that’s not necessarily the case.
Start by scooping the top-zone of your hair into a horseshoe parting and tie it up with a bobble. This is absolutely essential as you don’t want to cut the top section too short! Then, pin up any other wisps of hair that you don’t want to be as short as the hair around your ears and at the nape of your neck. Next, take a deep breath and go to work on the loose hair with clippers.
These are all optional, but they can transform your cut even further to look like a pro did it. To trim your hair at home, start by sectioning your hair into at least four sections. Divide your hair in half from ear to ear, tie or pin the top half up, and then section the top half and the bottom half into their own sections with a hair tie, scrunchie, or clip. “It helps you focus and will help you trim to the same length in each section,” says Brown. And if you have really long or thick hair, Brown says you can take it a step forward and divide each of those four sections in half too.
Divide your hair into sections by layer to ensure that the layers on both sides of your head are the same length. Use professional salon hair clips to firmly secure each section. After all, you need to see exactly what you’re doing, especially if this is your first time cutting your own hair. You’ll also need a room with access to a sink and two mirrors — ideally, one wall mirror and one mirror you can use to see the back of your head.


No comments:
Post a Comment